Clipboard Group
Power hiding in plain sight
Have you ever wondered what the paste symbol is? It is a Clipboard. Most of the time this feature collects data onto the Clipboard in the background, but you can also access the Clipboard on the Ribbon in the Home Tab: Clipboard Group.

By clicking in the lower right-hand corner of the Clipboard Group, you can open the Clipboard Task Pane.
Collection on the Clipboard
Normal copying and pasting does not collect multiple sources of data to be pasted at a later time. Using the Clipboard allows collection of up to 24 different data sources. Data can be collected onto the office Clipboard by Cutting or Copying.
Cutting removes the data from the source. The Cut command looks like a pair of scissors. It is in the Clipboard group and can be pinned to the Quick Access Toolbar (QAT). The shortcut for this command is Ctrl+X or drag-and-drop.
Copying retains the data at the source while collecting the data on the Clipboard. The Copy command looks like two pieces of paper. It is also in the Clipboard group and can be pinned to the QAT; the shortcut is Crtl+C.

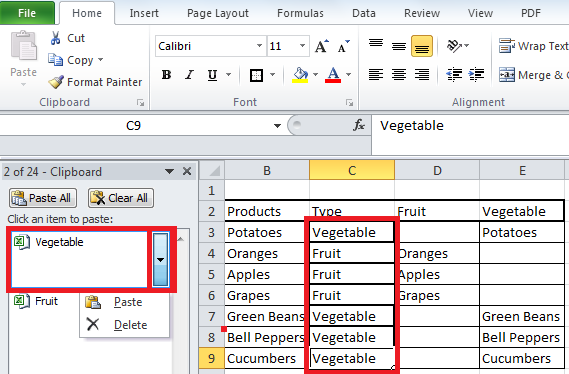
In this example the Clipboard has two data sources collected. The products in this example are fruits and vegetables. Each product needs assigned a type so that you can tell Excel what to do with each type.
From the Clipboard Task Pane you can click each cell in Column C and then paste one at a time either fruit or vegetable. This would be faster then typing Fruit or Vegetable in each cell, especially if you had 50 different products.
At the bottom of the Clipboard Task Pane is an options menu that lets you choose when and how the Clipboard acts while it is hidden.
To paste from the Clipboard, either click on the item on the Clipboard, or click to the right of the item in the blue box to open the drop-down menu, then click paste.
The Paste shortcut Ctrl+V will paste the last data point that was pasted.
To remove an item from the Clipboard, open the drop-down menu for that item and click delete. If you are done with everything on the Clipboard, then click Clear All at the top of the Clipboard Task Pane.
Drag-and-Drop Cutting

Easily move data around your workbook by drag-and-drop. Select what you would like to move. Click-and-hold on the border of your selection, then drag it to where you want it.
If you want to drag it onto another sheet of your workbook, drag it onto the tab for that sheet and press Alt.

This is what your cursor will look like when you are ready to move an object in Office.
Format Painter

This is a powerful tool that looks like a paintbrush. It copies a cell's formatting and is then pasted in the next cell or group of cells that are selected. To paste in multiple different cells, double-click the format painter tool while the cell with the formatting you want is selected.
Because the cells containing Fruit and Vegetable we pasted earlier had thick borders, that formatting pasted as well. By selecting a cell with the formatting we want, in this case cell E17, we can copy just the formatting and not the formula that is displayed in the formula bar.

Paste Options
Normal Paste

To paste, select the cell that will be the upper left corner of any data to be pasted.
Normal pasting brings formatting, formulas, and raw data from the source. It does not adjust column widths.

Paste: No Borders
This option is real straight forward. It does everything normal paste does except it elimanates all borders.
Paste: Keep Source Column Widths

This command can be very helpful if you have taken the time to make the column widths at the source just like you want them.
Paste: Transpose
As a reminder, the columns in Excel are vertical and have letters as headings. The rows are horizontal and have numbers as headings.
Often when organizing data into a blank worksheet, I change my mind halfway through as to how I want to lay out the columns and rows. Paste Transpose will give a quick snapshot of what it will look like to flip your data. Now the columns and rows have switched.
Usually you will want to have the categories with the most unique data be your column headings because it is easier to scroll down through your data instead of sideways.
Paste: Values
This paste option allows you to take the result of any formulas you have used to manipulate your data and paste only the values in the destination cells. Note: Any changes to the cells referenced in the formulas at the source will not cause the destination cells to update, only the values have been pasted.
Paste: Formatting

Very similar to Format Painter, this tool pastes only the formatting. The destination cells retain the data they contained before the paste.
The main difference between Format Painter and Paste Formatting is the size of the source data.
With Format Painter the source can be smaller than the destination cells.
With Paste Formatting both the source and destination cells will cover the same number of cells.
Paste: Options

After pasting and before you do anything else, if you don't like how your data pasted you can change which paste option you want.
Open these options by clicking on the Paste Options box that appears in the lower right-hand corner of your data after pasting. Choose the option that works best for you.
To see these tools in action, click-through to the vlog version HERE.
I hope this has been helpful for you. It may take some practice to learn the language of Excel and choose the right tool for the job the first time.
I'm looking forward to doing more in-depth tutorials. Next week we will look at some basic logical arguments and how to write a formula.
Until then,
Nathan
-Every cell = a calculator!
No comments:
Post a Comment